Month: June 2014

Intro to Swift

Swift – Control Structures

Apple's Swift LanguageIn the previous post in this Swift series, we looked at collections and iterating over those collections. In this post, I want to take a look at control structures. How does Swift allow you to make decisions in your code?

Much the same way that the for loop looked very familiar to us, only lacking parentheses, the if statement behaves the same way. As you’d expect, the following code outputs “You cannot register to vote”.

let age = 7;

if age >= 18 {
    println("You can register to vote")
} else {
    println("You cannot register to vote")
}

For a predefined number of “if statements”, many developers like to use a switch statement. Traditionally, in c-based languages, you would switch on a variable and then provide a case for each of your possibilities. Here is an example of a Swift Switch statement that would output “Back to the Grind” to the console.

let dayOfWeek = "Monday"

switch dayOfWeek {
    case "Saturday", "Sunday":
        println("Party!")
    case "Monday":
        println("Back to the Grind")
    case "Wednesday":
        println("Hump DAY")
    default:
        println("Just another day")
}

There are several interesting things to point out here. The first is that you don’t need break statements after each case. The reason for break statements is because when you want to have the same action for multiples cases, you would stack them without a break. In Swift, you just make a comma-separated list between the case keyword and the colon, as I did for Saturday and Sunday above. To me, this makes a lot of sense and is much cleaner.

If you omit the default option, though, you get an interesting error that says “error: switch must be exhaustive, consider adding a default clause”. That means that you must account for every possibility in your switch statement code. But how smart is it? Consider this example:

let guess = 7

switch guess {
    case 0:
        println("Your guess is 0")
    case let x where x > 0:
        println("Your guess is positive")
    case let x where x < 0:
        println("Your guess is negative")
}

This code covers every possible value for x and therefore is logically exhaustive. However, as it is, it also causes the “error: switch must be exhaustive, consider adding a default clause” error to appear. I have to change the code to this for it to work:

let guess = 7

switch guess {
    case 0:
        println("Your guess is 0")
    case let x where x > 0:
        println("Your guess is positive")
    case let x where x < 0:
        println("Your guess is negative")
    default:
        println("This will never ever get called")
}

I also added another interesting feature of Swift’s Switch statement and that is the ability to make a local copy of the variable and then use that to make any comparison rather than to compare only against a constant. That is another very powerful feature.

The While keyword is another way that we can control program execution. As is our pattern, this looks like a standard c-style while loop, minus the parentheses.

var number = -100

while number < 0 {
    println(number)
    number += 10
}

This gives us the following output:
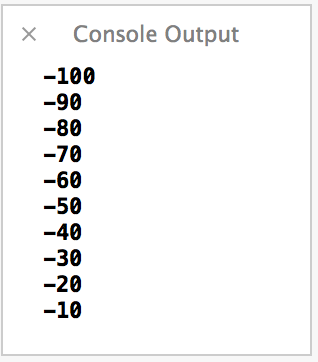
Swift While Loop

But, what if our original value was 10, like this? Our code wouldn’t do anything.

var number = 10

while number < 0 {
    println(number)
    number += 10
}

If we want to ensure that our code is executed at least once, we can employ the do-while structure, which looks like this:

var number = 10

do {
    println(number)
    number += 10
} while number < 0

Now, we execute at least once before we see that we don’t meet the conditions.
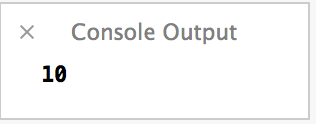
Swift Do While Loop

That only leaves us one last basic control structure and that is the standard for loop. I have the option of doing the c-style parentheses-free version.

for var i = 1; i <= 10; i++ {
    println(i)
}

If I’m doing a range, though, I can also declare that range in a Ruby-ish way.

// ..< does not include the upper bound
for i in 1..<10 {
    println(i)
}

// ... does include the upper bound
for i in 1...10 {
    println(i)
}

UPDATE 7/16/2014: In Xcode 6 beta 3, the Swift language was changed and the non-inclusive range was changed from the “..” operator to “..<" for readability reasons. If you are on Beta 2 or less, use ..

That’s it for control structures. Next time, we’ll take it up a notch and take a look at declaring and calling functions in Swift.

Intro to Swift

Swift – Collections and Iterations

Apple's Swift LanguageLast time, we had a small intro to Swift and saw how to declare simple variables and do some string work. This time, we are going to look at some more complex types and take a look at how Swift does iteration over collections.

To declare an array, you can just use this simple syntax. Note that unlike Objective-C, you don’t have to nil terminate the array. Arrays are also zero-based, so given the array below, the value of favoritePodcasts[0] is “Hanselminutes”.

var favoritePodcasts = ["Hanselminutes", ".Net Rocks!", 
     "iPhreaks", "Pete on Software Podcast"]

The dictionary syntax is very similar to the array syntax and looks a lot like JavaScript JSON syntax.

var podcastHosts = [
    "Hanselminutes" : "Scott Hanselman",
    ".Net Rocks!" : "Carl Franklin and Richard Campbell",
    "iPhreaks" : "Charles Max Wood et al",
    "Pete on Software Podcast" : "Pete Shearer"
]

To access one of the entries, you just call it with the key, like JSON. In this case podcastHosts[“iPhreaks”] would be “Charles Max Wood et al”.

If you want to just declare an array or dictionary, you just use this simple syntax.

var emptyArray = [String]()
var emptyDictionary = Dictionary<Int, String>()

UPDATE 7/16/2014: In Xcode 6 Beta 3, the Swift syntax for arrays was changed from String[]() to [String]()

Now, let’s look at how we can iterate over these collections. This should be very comfortable syntax if you are familiar with JavaScript, minus the parentheses.

for podcast in favoritePodcasts {
    println(podcast)
}

This gives us the following output in the XCode Playground when I include it after the code that we’ve already written:
Swift Iterate an Array

Let’s take this up another notch and for each podcast, pull out its hosts from the dictionary and write those hosts to the console. We’ll use the iteration flow we just covered, the key-value dictionary retrieval syntax, and the string interpolation that we looked at last time to accomplish this.

for podcast in favoritePodcasts {
    var host = podcastHosts[podcast]
    println("\(podcast) is hosted by \(host)")
}

That will give us this result to the console:
Swift Iterate Array and Access Dictionary

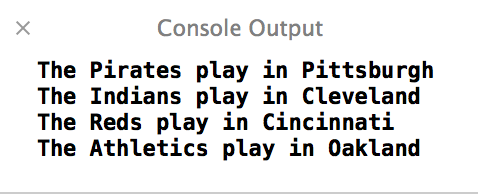
What if I wanted to iterate over the dictionary? Again, we are going to find some very familiar syntax. I’m going to make a new dictionary below and then iterate over it, writing out the values. You’ll notice that unlike some languages, you get both variables declared in the for syntax, and you don’t have to iterate keys and then access the values from the dictionaries.

var citiesAndBaseballTeams = [
    "Cincinnati" : "Reds",
    "Pittsburgh" : "Pirates",
    "Cleveland" : "Indians",
    "Oakland" : "Athletics"
]

for (city, team) in citiesAndBaseballTeams {
    println("The \(team) play in \(city)")
}

That gives us the following output:
Swift Dictionary Iteration

It is interesting to note that I did not change anything. It did print out of order with how I added those items. The dictionaries are definitely not expected to keep any kind of order for you when you iterate over them.

That’s it for this time. This post was starting to get a little long, so I’m going to save control flow for next time to try to keep this as focused and non-rambling as possible.

Business of Software

Podcast Episode 17 – Going Independent

Going IndependentIn Episode 17, I talk about what it takes to go independent as a software developer. After taking a moment to give all of the provisos that I’m not an expert offering legal or financial advice, I spend this episode talking about what my journey has been like. How did I come up with a name? How did I find work? What about health insurance? What about rates? I cover all of that and more in this episode.

While this episode is certainly not exhaustive, I do try my best to talk about what I had to go through while becoming an independent developer. There are a lot of little things that I had to tackle that were unknown to me before I took the plunge. And the fear of that unknown kept me from moving forward for a long time. I hope that some of what I’ve shared in this episode will encourage anyone who is looking to start out on their own.

Links Mentioned in this Show:

SCORE

Dublin Entrepreneurial Center

Michael Eaton’s Deep Fried Bytes Episode Announcement

John Sonmez’s Course

John on .Net Rocks! and on The Polymorphic Podcast

You can also subscribe to the podcast at any of these places:
iTunes Link RSS Feed Listen on Stitcher

Thanks to all the people who listen, and a special thanks to those who have rated me. I really appreciate it.

The episodes have been archived. Click Here to see the archive page.

Intro to Swift

Intro to the Swift Programming Language

Apple's Swift LanguageThe biggest story out of the 2014 WWDC Keynote was easily the introduction of the new Swift Programming Language. Not to be confused with another language called Swift, a completely unrelated language used for parallel scripting, Swift is a fast and modern language that designed for safety.

When I say that it is fast, what does that mean? During the keynote, they gave a benchmark sorting a list of objects. They declared Python to be a baseline and claimed that Objective-C was 2.8 times faster than Python. That makes sense because Python is typically interpreted (as it most likely was for this benchmark) and Objective-C is compiled. So, what about Swift? Swift was 3.9 times faster than Python, an impressive improvement over Objective-C.

What about something a little more computationally difficult? With Python again as a baseline, RC4 encryption is 127 times faster in Objective-C. However, Swift is actually 220 times faster than Python, which is an even larger gap than the more simple object sort benchmark. I think we might be beginning to see where the language’s name came from.

What about the “designed for safety” part? What does that even mean? What that means is that you literally cannot shoot yourself in the foot with many common errors because they are just not possible in the Swift language. You cannot cause buffer overflows, operate on uninitialized variables, use Gotos, perform unsafe string formatting, etc. The language is set up in a way to allow you to “fall into the pit of success” with regards to many language errors that leave security holes.

What about modern? One thing is that Swift has modern features like closures, generics, namespaces, type inference, and multiple return types. The other thing is that the language syntax feels very modern. It feels a lot like Ruby and JavaScript and it ditches a lot of the “ceremony” that you had to adhere to when writing Objective-C. I’ll admit that I hated Objective-C, but Stockholm Syndrome has set in and I have actually enjoyed using it of late. I’ll be interested to see if the Ease of Useā„¢ of Swift will make my Stockholm Syndrome fade away and make me see what I’ve been missing.

The other really neat thing about Swift is its REPL, which is implemented in Xcode Playgrounds. A playground looks like this:

Swift Playground

This playground example also demonstrated some of the syntax. Like Javascript and C#, you can just declare the variable with the var keyword and its type will be inferred. The let keyword creates a constant. If we need to help Swift infer a type, we can use the :Type syntax. We can see examples of all three of these below:

var str = "Hello, playground" // inferred as a string
var age = 7 // inferred as an int
let planetName = "Earth" // a constant string

var salary = 4000 // inferred as an int, but that's wrong
var salaryCorrect :Double = 4000 // now given the hint to be a Double instead

Types are still very important to Swift, though. For instance, if I try to execute this code:

let greeting = "Hi, I was born in "
let year = 1977
let completeGreeting = greeting + year

If I do that, I get the error “‘String’ is not convertible to ‘UInt8′”.
Update 7/16/2014 – As of Xcode 6 Beta 3, this error changed to this from the previous error of “Could not find an overload for ‘+’ that accepts the supplied arguments”

Instead, I have to explicitly cast the int to a string like this:

let greeting = "Hi, I was born in "
let year = 1977
let completeGreeting = greeting + String(year)

One final example in this simple introduction to Swift is the much easier way to do what I just did above. Wouldn’t it be easier if I could do something like C#’s String.Format() or Ruby’s string interpolation? Yes it would, and yes I can! My previous example could also be written this way:

let year = 1977
let completeGreeting = "Hi, I was born in \(year)"

And what if I wanted to execute a little bit of code via an expression in there? I could easily do that like this:

let year = 1977
let completeGreeting = "Hi, I was born in \(year)."
let altGreeting = "If I had been born 10 years later, it would have been \(year + 10)"

This post just scratched the surface of what Swift is and how its syntax can be used to handle simple variables. In my next Swift post, I’ll cover some more complex types, control flows, and how to declare functions.

iOS

Podcast Episode 16 – WWDC 2014 Recap

WWDC 2014 LogoIn episode 16 of the podcast, I recapped the 2014 Worldwide Developer’s Conference (WWDC). I had the keynote on in the background when it was broadcast (Monday, June 2nd), but I hardly paid attention to it. I was getting regular updates from co-workers and I saw Twitter explode when Swift was announced. I also went and read recaps and listened to other podcast recaps, but they didn’t really hit on the details. They focused on the headlines.

I had it in my mind that day to do a WWDC recap episode, but I needed to make the time to watch the 2 hour keynote for myself and take copious notes. I finally tackled that yesterday and sat down immediately after and shared my thoughts in this latest episode. This is actually my longest “solo” episode at 27 minutes, but I really tried to have it as full of material as possible. If you have been interested in the keynote and didn’t have time to watch it (or just wanted to hear my thoughts), check out this episode!

You can also subscribe to the podcast at any of these places:
iTunes Link RSS Feed Listen on Stitcher

Thanks to all the people who listen, and a special thanks to those who have rated me. I really appreciate it.

The episodes have been archived. Click Here to see the archive page.