Month: August 2008

Code Tips

Lambdas – An Introduction

Lambda Lambda LambdaI will admit that I was pretty confused about Lambdas at first. There was a lot of hype about it and the syntax threw me at first. I wasn’t sure how to read (in English) what the code was trying to do. Some time ago, I decided to really bear down and figure out what this was about and I’ve decided to share what helped me so that maybe it could help someone else.

Lambdas were added with C# 3.0 (which shipped with the 3.5 Framework, which runs on the 2.0 Runtime… ah Marketing!). However, in reality, they are basically some syntactic sugar around anonymous delegates which have been around since the 2.0 Framework came out. Let’s look at this very simple code.

using System;
using System.Collections.Generic;

namespace Lambdas
{
    class Program
    {
        static void Main(string[] args)
        {
            List<object> list = new List<object>() { 1, "a", 2, "b" };

            List<object> justNumbers = list.FindAll(IsInt32);

            foreach (object i in justNumbers)
            {
                Console.WriteLine(i);
            }
        }

        static bool IsInt32(object input)
        {
            int i;
            return Int32.TryParse(input.ToString(), out i);
        }
    }
}

Okay, the Find() and FindAll() methods on the List<T> take a Predicate as an argument. What a predicate is is a special kind of delegate (a way to pass around a function or method like a variable) that evaluates a specific item and determines if it is true or false for some condition. In this case, I return whether or not the object is an integer. I have named my predicate IsInt32 and I pass it by name into the FindAll method.

I could also use an anonymous delegate and just declare the bit of code inside IsInt32 inline to that FindAll method. That looks like this.

using System;
using System.Collections.Generic;

namespace Lambdas
{
    class Program
    {
        static void Main(string[] args)
        {
            var list = new List<object>() { 1, "a", 2, "b" };

            var justNumbers = list.FindAll(
                delegate (object o) {int i; return Int32.TryParse(o.ToString(), out i);}) ;

            foreach (object num in justNumbers)
            {
                Console.WriteLine(num);
            }
        }
    }
}

In this case, I declare to the compiler that I am going to declare an inline method to use and that it is to be treated as a delegate (and as such can be passed around). If you compile and run both programs, you will see that they produce the same output. But none of this is a lambda. Lets take a look at the last example with lambda syntax.

using System;
using System.Collections.Generic;

namespace Lambdas
{
    class Program
    {
        static void Main(string[] args)
        {
            var list = new List<object>() { 1, "a", 2, "b" };

            var justNumbers = list.FindAll(
                (object o) => { int i; return Int32.TryParse(o.ToString(), out i); });

            foreach (object num in justNumbers)
            {
                Console.WriteLine(num);
            }
        }
    }
}

Okay, we only changed our syntax slightly. We ditched the delegate keyword and we put in this funny => symbol. What that has done is has identified an inline method a different way. In the snippet below we are defining that our method takes a parameter of type object named o and then the => means “this method then does” and then I go on to put code that would exist in that method.

(object o) => { int i; return Int32.TryParse(o.ToString(), out i); }

However, we can ignore the type definition, because the compiler can infer the type for us. So that code can then become

o => { int i; return Int32.TryParse(o.ToString(), out i); }

That doesn’t read any differently, but this syntax (the common syntax, btw) is what I’ve found confuses the most people. In fact, to prove that I’m not lying to you, I’ve built my project with that line in it (the o=>) and then looked at the code in Reflector. This is what is returned for the relevant section.

List<object> <>g__initLocal0 = new List<object>();
        <>g__initLocal0.Add(1);
        <>g__initLocal0.Add("a");
        <>g__initLocal0.Add(2);
        <>g__initLocal0.Add("b");
        List<object> justNumbers = <>g__initLocal0.FindAll(delegate (object o) {
            int i;
            return int.TryParse(o.ToString(), out i);
        });

As you can see, the compiler took that syntax and merely created an anonymous delegate just like in our anonymous delegate example. You see the delegate keyword is in there, as well as the explicit “object o” declaration.

I can also take a second to “nerd out” about Reflector and point out another bit of compiler trickery. You see that I had been using the “object initializer” syntax when I declared the initial List<object> where I filled the list just by including the items after the declaration inside of the curly braces. If you see the Reflector code, the compiler still has to generate the code that does list.Add(), even if I am spared the keystrokes.

Hopefully, this has been a helpful introductory primer on Lambdas for anyone who may have been having some confusion. Another time I will take a look as to how lambda expressions can be used in LINQ.

Code Tips

WCF Service Error

I was modifying a service last night and I got this error when I hit one of the two endpoints of the service.
The server was unable to process the request due to an internal error...
For search engines (and anyone having a hard time reading the image), it says:

The server was unable to process the request due to an internal error. For more information about the error, either turn on IncludeExceptionDetailInFaults (either from ServiceBehaviorAttribute or from the configuration behavior) on the server in order to send the exception information back to the client, or turn on tracing as per the Microsoft .NET Framework 3.0 SDK documentation and inspect the server trace logs

The other endpoint on my service was unaffected. Usually when I do something stupid, I get the “Yellow Screen of Death” the first time I try to reach my service due to an improper web.config or some other easily correctable thing. This was the first time that I had seen this.

I did some Googling and found out specifically how to get the “real” error message. I had to change my serviceDebug tag in my service’s web.config (located in system.ServiceModel/behaviors)

 <serviceBehaviors>
        <behavior name="PeteOnSoftware.SampleService_Behavior">
          <serviceDebug includeExceptionDetailInFaults="true" />
          <serviceMetadata httpGetEnabled="true"/>
        </behavior>
</serviceBehaviors>

This gave me a much more helpful message telling me that one of the elements in one of my request objects had already been defined (name and type were the defining factors) in another existing request.

There were two fixes for this. Once was a “hack” in my opinion and the other was the “correct” solution. The hack was to turn off metadata exchange on that endpoint (my particular error was related to generating the WSDL). To do that, I would have set the

<serviceMetadata httpGetEnabled="true"/>

to

<serviceMetadata httpGetEnabled="false"/>

and remove this line from beside my endpoint definition.

<endpoint contract="IMetadataExchange" binding="mexHttpBinding" address="mex" />

That would prevent developers from inside the company from generating proxy classes automatically with svcutil.exe. I didn’t want that at all.

What I did instead was to rename the element to something that made more sense anyway. This time when I built, the endpoint came up with no problem and the link to the WSDL returned the proper XML that developers would need to “reproxy”. Problem solved and lesson of the includeExceptionDetailInFaults learned!

Code Tips

TDD with NUnit

If you haven’t read my first NUnit post and aren’t familiar with NUnit or TDD, you might want to check it out here.

Last time we just looked at the basic ways that you make tests and use the test runner to verify their results. In this post, I’d like to examine how you might go about doing true “Red. Green. Refactor.” Test Driven Development (TDD).

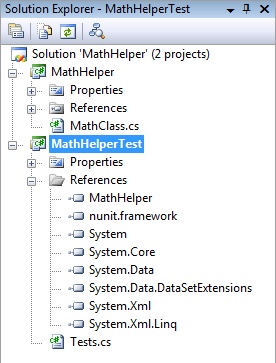
First, I’d like to make a new C# Class Library Application named MathHelper. Rename Class1.cs to MathClass. Additionally, immediately add another project to the solution. Right click on the solution, Add-> New Project. Choose a Class Library Project and call it MathHelperTest. Rename Class1.cs to Tests.cs. Add a reference to the nunit.framework dll and the output from our MathHelper project. Your Solution Explorer should now look like this.
The initial Solution Explorer.

Now, we do need to have something so that the test class will compile and we do have a general idea of what we need from requirements gathering, so put the following code in the MathClass.cs file inside the MathHelper project.

using System;

namespace MathHelper
{
    public class MathClass
    {
        public static double Add(double p1, double p2)
        {
            throw new NotImplementedException();
        }

        public static double Subtract(double p1, double p2)
        {
            throw new NotImplementedException();
        }

        public static double RaiseToPower(double baseNumber, double exponent)
        {
            throw new NotImplementedException();
        }

        public static double Factorial(int number)
        {
            throw new NotImplementedException();
        }
    }
}

What you can see is that I’ve stubbed in the methods that I expect my class to contain. What I’ve also done is make sure they all throw NotImplementedExceptions when they are called, since I’m not writing any functional code until after I write my tests.

So, lets write some tests already! In Tests.cs inside of our MathHelperTest project, enter the following code.

using NUnit.Framework;
using MathHelper;

namespace MathHelperTest
{
    [TestFixture]
    public class Tests
    {
        [Test]
        public void TestStandardAdd()
        {
            Assert.AreEqual(77, MathClass.Add(42, 35));
        }

        [Test]
        public void TestStandardSubtract()
        {
            Assert.AreEqual(31, MathClass.Subtract(77, 46));
        }

        [Test]
        public void TestStandardSquareExponent()
        {
            Assert.AreEqual(25, MathClass.RaiseToPower(5, 2));
        }

        [Test]
        public void TestStandardFactorial()
        {
            Assert.AreEqual(120, MathClass.Factorial(5));
        }
    }
}

Okay, for the sake of simplicity, lets fire up our NUnit GUI and load the MathHelperTest.dll and run our test suite. (If you are unsure how to do this, please refer to my initial NUnit post). It should come as no surprise that all four of our tests failed with Not Implemented failures. Now, lets go back and add some code to make the tests pass.

Change the code in MathClass.cs to this:

using System;

namespace MathHelper
{
    public class MathClass
    {
        public static double Add(double p1, double p2)
        {
            return p1 + p2;
        }

        public static double Subtract(double p1, double p2)
        {
            return p1 - p2;
        }

        public static double RaiseToPower(double baseNumber, double exponent)
        {
            double answer = 1;

            for (int i = 0; i < exponent; i++)
            {
                answer = answer * baseNumber;
            }

            return answer;
        }

        public static double Factorial(int number)
        {
            double answer = 1;

            for (int i = 1; i <= number; i++)
            {
                answer = answer * i;
            }

            return answer;
        }
    }
}

Run the tests again and they should all 4 pass. Woohoo, we’re done, right? Well, not exactly. First of all, our test coverage met the minimum requirements, but didn’t really test the code very well. Secondly, our Math implementation isn’t very great. Let’s solve the first problem first and add some more tests.

using NUnit.Framework;
using MathHelper;
using System;

namespace MathHelperTest
{
    [TestFixture]
    public class Tests
    {
        [Test]
        [Category("Add Method")]
        public void TestStandardAdd()
        {
            Assert.AreEqual(77, MathClass.Add(42, 35));
        }

        [Test]
        [Category("Subtract Method")]
        public void TestStandardSubtract()
        {
            Assert.AreEqual(31, MathClass.Subtract(77, 46));
        }

        [Test]
        [Category("Exponent Method")]
        public void TestStandardSquareExponent()
        {
            Assert.AreEqual(25, MathClass.RaiseToPower(5, 2));
        }

        [Test]
        [Category("Factorial Method")]
        public void TestStandardFactorial()
        {
            Assert.AreEqual(120, MathClass.Factorial(5));
        }

        [Test]
        [Category("Add Method")]
        public void TestNegativeAdd()
        {
            Assert.AreEqual(500, MathClass.Add(700, -200));
        }

        [Test]
        [Category("Subtract Method")]
        public void TestNegativeSubtract()
        {
            Assert.AreEqual(90, MathClass.Subtract(45, -45));
        }

        [Test]
        [Category("Exponent Method")]
        public void TestNegativeExponent()
        {
            Assert.AreEqual(.25, MathClass.RaiseToPower(2, -2));
        }

        [Test]
        [Category("Exponent Method")]
        public void TestDecimalExponent()
        {
            Assert.AreEqual(5, MathClass.RaiseToPower(25, .5));
        }

    }
}

When we rerun our tests in the NUnit Test Runner, we now see that two of them fail (TestDecimalExponent and TestNegativeExponent). Lets see if we can fix our code. MathClass.cs should now look like this.

using System;

namespace MathHelper
{
    public class MathClass
    {
        public static double Add(double p1, double p2)
        {
            return p1 + p2;
        }

        public static double Subtract(double p1, double p2)
        {
            return p1 - p2;
        }

        public static double RaiseToPower(double baseNumber, double exponent)
        {
            return Math.Pow(baseNumber, exponent);
        }

        public static double Factorial(int number)
        {
            double answer = 1;

            for (int i = 1; i <= number; i++)
            {
                answer = answer * i;
            }

            return answer;
        }
    }
}

Okay, all tests pass. Now, lets see if we can do the Factorial method a little better and use a little recursion. We can safely experiment, because we know that our unit test will ensure that it still returns the correct value.

        public static double Factorial(int number)
        {
            // Lets do this recursively.
            double answer;

            if (number.Equals(1)) return 1;
            answer = Factorial(number - 1) * number;
            return answer;
        }

Run the tests and we’re still green, so we’re good. You would continue to go on in this manner. Add additional tests first to test functionality, then code the functionality, then refactor your code to make it efficient, extensible, and maintainable and run your tests again until all is green.

I understand that we could take this sample code further, write more tests, and create better code, but that is always the trade-off. You have to take into account where your code will be used, how mission critical your app is, and decide what level of risk your code can have due to anything less than 100% brilliant testing with 100% code coverage.

Code Tips

NUnit

NUnit. Chances are that you know what NUnit and Test Driven Development are, but if you don’t I’ll give you a quick primer. Test Driven Development means that you drive your development from tests. I know I just reversed the order of the words, but lets take a look at what that means 😉 Test Driven Development has a little motto that goes, “Red. Green. Refactor”.
Red. Green. Refactor.

The red refers to writing the tests for what you want your code to do before you write the code to do it. When a test fails in NUnit (and other Testing Frameworks), they show up as red. Next, you write the actual functional code to make the test pass (green), and then you refactor the code so it is as clean, extendable, testable, and maintainable as possible. Then you run the tests again to make sure that none fail. If they do, you fix your code so that the tests can pass again. You repeat this process as much as is prudent for the project that you are on.

The extra added benefit is that you can feel safe in making changes to your code later. If you have written sufficient test coverage, you can run your tests and if they all pass, then your changes will cause no problems when you deploy.

Now, on to NUnit. NUnit is the first unit testing framework that I ever heard of or used, so I have a soft spot for it. You can get started by downloading NUnit from their download page here. The easiest way to get going quickly is to pick the download named NUnit-2.4.8-net-2.0.msi and then just run the install wizard.

Once you have everything installed, let’s get started. For a sample, let’s just make a new C# class library project called NUnitExample. Add a reference to nunit.framework.dll that can be found at (if you accepted the defaults on install) at C:\Program Files\NUnit 2.4.8\bin\nunit.framework.dll.

Now, enter the following code into the default Class1.cs file and build the project:

using System;
using NUnit.Framework;

namespace NUnitExample
{
    /// <summary>
    /// [TestFixture] is an attribute that you 
    /// add above any class that you want to 
    /// contain tests.
    /// </summary>
    [TestFixture]
    public class MathTests
    {
        protected int a;
        protected int b;
        protected int c;

        /// <summary>
        /// Any variable setting or state 
        /// setup you need to do can be done
        /// in a method marked with the 
        /// [TestFixtureSetUp] attribute.
        /// </summary>
        [TestFixtureSetUp]
        protected void Setup()
        {
            a = 9;
            b = 2;
            c = 0;
        }

        /// <summary>
        /// You can create tests by applying 
        /// the [Test] attribute to any method 
        /// that is public, takes no params, 
        /// and returns void. If the method 
        /// does not meet these requirements, it 
        /// will be ignored.
        /// </summary>
        [Test]
        public void Adding()
        {
            Assert.AreEqual(11, a + b);
        }

        /// <summary>
        /// This Test will fail. Normally, you test for purposeful failure 
        /// (like a validation error) and that is a "passed test", that 
        /// isn't what I'm doing here.  I'm just showing what a failed test 
        /// looks like in the Test Runner.
        /// </summary>
        [Test]
        public void Dividing()
        {
            Assert.AreEqual(4.5M, a / b);
        }

        [Test]
        public void DivideByZeroException()
        {
            try
            {
                int x = a / c;

                // If we get to this line, throw an 
                // exception because the above division 
                // shouldn't work.
                throw new Exception("Division Worked");
            }
            catch (Exception ex)
            {
                Assert.IsInstanceOfType(typeof(DivideByZeroException), ex);
            }
        }

        [Test]
        public void Comparison()
        {
            Assert.That(a > b);
        }

        /// <summary>
        /// These next 3 tests will be ignored 
        /// because their signatures aren't 
        /// correct.
        /// </summary>
        [Test]
        private void Ignored1()
        {
            Assert.AreEqual(1, 2);
        }

        [Test]
        public string Ignored2()
        {
            Assert.AreEqual(1, 2);
            return string.Empty;
        }

        [Test]
        public void Ignored3(int a, int b)
        {
            Assert.AreEqual(1, 2);
        }
    }
}

Now, fire up the NUnit Test Runner GUI. It is located at C:\Program Files\NUnit 2.4.8\bin\nunit.exe. When it opens, click File –> Open Project and then navigate to the .dll that was created from the project that you built and click “Open”.

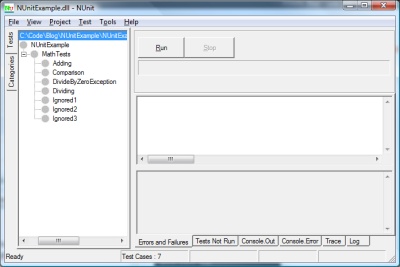
The NUnit GUI should now look like this:
NUnit Ready to Run Tests

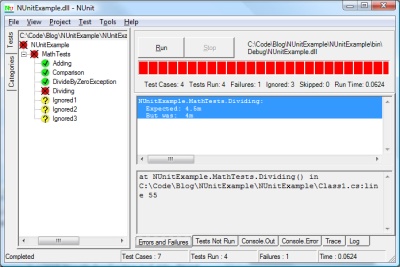
Make sure you have the top level highlighted and click Run. It will look like this:
NUnit After Initial Tests

What you see is that the entire test fixture of NUnitExample has failed (the red circle with the X). Parent levels are always shown as having the same success level as the lowest success level below it. You see that Adding, Comparison, and DivideByZeroException passed. No surprise here. Additionally, the three tests named ignored have been ignored because their signatures were incorrect. If you click the “Tests Not Run” tab at the bottom of the runner, you can see why.
Reasons for ignored tests

If you click the “Errors and Failures” tab, you will see why the Dividing Test failed.

NUnitExample.MathTests.Dividing:
  Expected: 4.5m
  But was:  4m

Oh, yeah. Integers only hold whole numbers. Lets go back and change the code. (Normally, you’d change your code, but here the “active” code is embedded in the tests because of this simple sample.) Change the Dividing test to the following:

public void Dividing()
{
    Assert.AreEqual(4.5M, Convert.ToDecimal(a) / b);
}

When you switch back to the NUnit Test Runner, it will have automatically refreshed because the test project has changed. Run it again and the Dividing test will pass and the overall status will be yellow because the lowest level of success in the child tests was also yellow.

If you instead would like to use the command line for NUnit (perhaps for continuous integration or just as part of your build task on your program) you can do that as well. Open a command window and enter the following command: (If you changed anything on NUnit install, change “c:\Program Files\NUnit 2.4.8\bin” to match your install path. The argument passed in is the path to the .dll of the project that you created.)

"c:\Program Files\NUnit 2.4.8\bin\nunit-console" c:\code\blog\NUnitExample\NUnitExample\bin\Debug\NUnitExample.dll

When you run it, you get the following results:

c:\Program Files>"C:\Program Files\NUnit 2.4.8\bin\nunit-console" C:\Code\Blog\NUnitExample\NUnitExample\bin\Debug\NUnitExample.dll
NUnit version 2.4.8
Copyright (C) 2002-2007 Charlie Poole.
Copyright (C) 2002-2004 James W. Newkirk, Michael C. Two, Alexei A. Vorontsov.
Copyright (C) 2000-2002 Philip Craig.
All Rights Reserved.

Runtime Environment -
   OS Version: Microsoft Windows NT 6.0.6001 Service Pack 1
  CLR Version: 2.0.50727.1434 ( Net 2.0.50727.1434 )

.....N.N.N
Tests run: 4, Failures: 0, Not run: 3, Time: 0.031 seconds

Tests not run:
1) NUnitExample.MathTests.Ignored1 : Method Ignored1's signature is not correct:
 it must be a public method.
2) NUnitExample.MathTests.Ignored2 : Method Ignored2's signature is not correct:
 it must return void.
3) NUnitExample.MathTests.Ignored3 : Method Ignored3's signature is not correct:
 it must not have parameters.

In a later post, I will look at doing Test First development with a true “Red. Green. Refactor.” feel.